
What Is a Glute Bridge?
The glute bridge exercise is a simple but seriously effective floor exercise that targets your gluteus maximus—aka the biggest muscle in your backside. It also gets your hamstrings, core, and lower back working too, making it a great all-around move. The best part? You don’t need anything fancy to do it—just your body and a little floor space.
If you’ve been hitting the gym but still feel like your glutes just aren’t growing, this move could be the missing piece. Glute bridges help you really connect with your glutes and fire them up properly, which is key if you want to actually see progress (and not just feel it in your quads every time you train legs).
One thing to keep in mind: glute bridges often get mixed up with hip thrusts, but they’re not exactly the same. Hip thrusts usually involve resting your upper back on a bench and using heavier weight—like a barbell across your hips. Glute bridges, on the other hand, are done right on the floor and are perfect for activating your glutes without putting a ton of stress on your lower back or needing a bunch of equipment.
Why Should You Do Glute Bridges?
Let’s be real—strong glutes aren’t just about looks. They’re essential for posture, balance, athletic performance, and injury prevention. Here’s why glute bridges should be in your weekly routine:
-
Strengthens the posterior chain: Glute bridges target the muscles in the back of your body—especially your glutes and hamstrings. This helps balance out quad-dominant movements like squats or lunges.
-
Improves posture & reduces back pain: Weak glutes often cause the lower back to overcompensate. By strengthening your backside, you take pressure off your lower back and improve your posture naturally.
-
Boosts core stability: You’ll need to engage your core during every rep, which means you’re also building abdominal strength along the way.
-
Great for Beginners and Advanced Lifters: Whether you’re just starting out or you’re deep into strength training, glute bridges are easily scalable. Add weight, resistance bands, or hold the top position longer for a burn that keeps on giving.

Muscles Worked in the Glute Bridge Exercise
Before we get into the “how,” let’s talk about what’s actually working when you do a glute bridge.
The main star of the show? Your glutes—especially the gluteus maximus, which is the biggest muscle in your butt. But it doesn’t stop there.
You’ll also feel it in your:
-
Glute medius and minimus (the smaller glute muscles that help with hip stability)
-
Hamstrings (the muscles at the back of your thighs)
-
Lower back (it helps support the movement)
-
Core muscles (especially the deep ones that keep your spine stable)
-
Hip flexors (they’re not doing the lifting, but they help with control)
Understanding which muscles are working helps you focus your effort where it matters, so you’re not just going through the motions—you’re actually building strength where you want it.
Glute Bridge Exercise Tutorial – Video
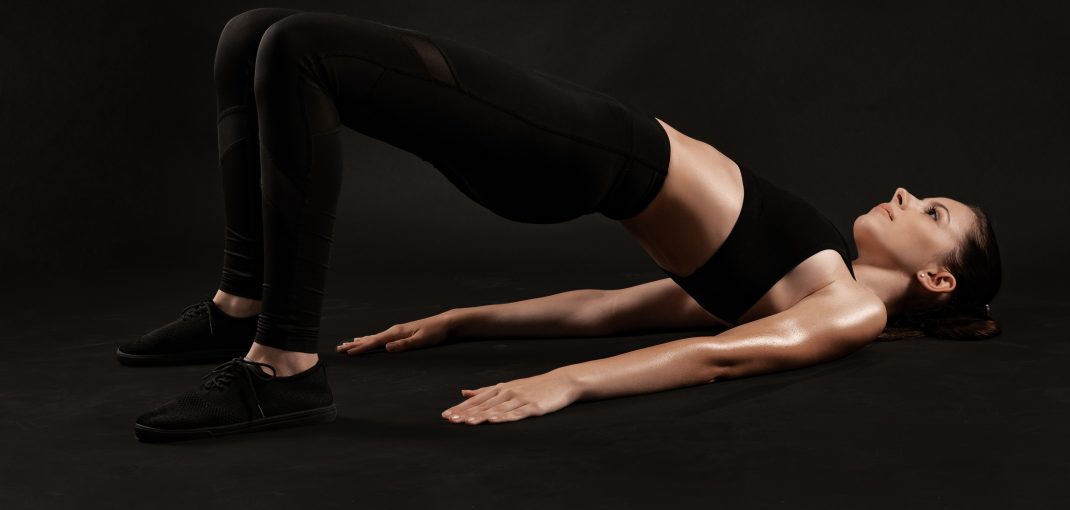
How to Do a Glute Bridge With Proper Form
Mastering your form is crucial for getting the most out of this movement—and for avoiding unnecessary strain on your lower back or hamstrings. Follow these steps closely:
Step 1: Set Your Position on the Floor
-
Find a flat, comfortable surface like a yoga mat or padded floor.
-
Lie on your back with your knees bent and your feet flat on the floor, about hip-width apart.
-
Position your feet so they’re roughly a foot-length away from your glutes. Too close, and you’ll feel it in your quads. Too far, and your hamstrings might take over.
-
Let your arms rest flat by your sides, palms down. This gives you some stability as you move.
👉 Pro tip: Your knees, hips, and shoulders should all stay in line throughout the movement.
Step 2: Engage Your Core and Set Your Spine
-
Before lifting, take a breath in and gently brace your core like someone’s about to poke your belly. You don’t want to suck in or push out—just tighten your abdominal wall.
-
Press your lower back lightly into the ground to eliminate any excessive arching.
-
Keep your neck relaxed and eyes facing the ceiling.
👉 Why this matters: Core engagement keeps your spine in a neutral position and prevents lower back compensation.
Step 3: Drive Through Your Heels and Lift Your Hips
-
Exhale as you press your heels into the floor and lift your hips up toward the ceiling.
-
As you rise, squeeze your glutes hard. Your hips should lift until your body forms a straight line from your shoulders to your knees.
-
Avoid pushing up so high that you arch your lower back—this is a common mistake.
👉 Key cue: Think about “tucking your pelvis under” slightly at the top to fully engage your glutes.
Step 4: Hold at the Top and Squeeze
-
At the top of the bridge, pause for 1–2 seconds and maintain the glute squeeze.
-
Keep your ribs down, your core engaged, and don’t let your knees flare out or cave inward.
👉 Optional challenge: Try holding the top position for 5–10 seconds to increase time under tension.
Step 5: Lower With Control
-
Inhale as you slowly lower your hips back down to the starting position.
-
Don’t let your back arch or hips drop too quickly—control is key here.
-
Reset your core and glutes, then repeat the movement.
👉 Make it count: Every rep should be intentional—not rushed.
Even though the glute bridge seems simple, it’s surprisingly easy to do it wrong—and that can limit your results or even lead to discomfort (especially in your lower back). Let’s walk through the most common form issues and how to correct them like a pro.
Glute Bridge Exercise Common Mistakes & How To Fix Them
Mistake #1: Arching Your Lower Back
This is probably the most common mistake people make—and it’s usually because they’re trying to lift their hips too high or they’re not engaging their core.
Why it’s a problem:
Overarching your lower back puts unnecessary stress on your spine and shifts the focus away from your glutes—where it belongs.
✅ How to fix it:
-
Before you lift, brace your core by gently tightening your abdominal muscles—like someone’s about to tickle your stomach.
-
As you rise, think about keeping your ribs and pelvis in line—this prevents your back from flaring up at the top.
-
Don’t chase height! You only need to lift until your hips, knees, and shoulders form a straight line—that’s enough to activate your glutes without stressing your spine.

Mistake #2: Not Actively Squeezing the Glutes
Just going through the motion isn’t enough. If you’re not consciously activating your glutes, other muscles (like your hamstrings or quads) will try to take over.
Why it’s a problem:
Without focused glute contraction, you miss out on the entire point of the exercise: building stronger, more functional glutes.
✅ How to fix it:
-
Before lifting, give yourself a mental cue: “Glutes do the work.”
-
At the top of the movement, actively squeeze your glutes as hard as you can—don’t just hang out there.
-
If you’re not feeling it in your glutes by rep 5 or 6, try adjusting your foot position or slowing your tempo to really dial into that mind-muscle connection.
Mistake #3: Lifting Too High (Hyperextending Your Hips)
Yes, we all want maximum range—but going beyond the natural line of your body often means your lower back is compensating, not your glutes working harder.
Why it’s a problem:
Overextending at the top can lead to spinal compression or lower back tightness. Plus, it takes the tension off your glutes.
✅ How to fix it:
-
Watch yourself in a mirror or have someone film a rep or two. You should stop when your hips are in line with your knees and shoulders—no higher.
-
Focus more on the quality of your squeeze at the top rather than how high your hips go.
-
If you’re lifting with added weight, lifting too high could cause tipping or shifting. Stick to the natural line of your body.
Mistake #4: Incorrect Foot Placement (Too Close or Too Far)
Your foot position can make or break the effectiveness of this exercise. If your feet are too close to your glutes, your quads take over. Too far away? Now your hamstrings are doing most of the work.
Why it’s a problem:
Misplaced feet = misplaced effort. You end up training the wrong muscles, which slows your glute progress and can even cause muscle imbalances.
✅ How to fix it:
-
Start by placing your feet so they’re about a foot-length away from your butt when lying down. This is a sweet spot for most people.
-
As you lift, make sure your shins are vertical at the top of the bridge—this is a good indicator you’re pushing from the right position.
-
Press through your heels, not your toes. If your heels come off the floor, you’re probably too close to your body.
Mistake #5: Rushing Through the Movement
Glute bridges aren’t a race. When people move too fast—especially during reps—they often rely on momentum instead of muscle, and that means less activation and more sloppy reps.
Why it’s a problem:
Speeding through the exercise reduces time under tension, which is crucial for muscle growth and proper activation. Plus, rushing makes it harder to control your form, increasing the chance you’ll arch your back or skip the glute squeeze altogether.
✅ How to fix it:
-
Slow down your tempo—aim for about 2 seconds up, a 1–2 second hold at the top, and 2 seconds down. This keeps the muscles engaged the entire time.
-
Focus on feeling the glutes work on every single rep. Quality > quantity.
-
If you’re doing high-rep sets, don’t treat them like cardio. Stay deliberate. Reset between each rep if needed to stay in control.
Variations of the Glute Bridge Exercise
Once you’ve nailed the basic bodyweight glute bridge, you can spice things up with a few variations:
1. Single-Leg Glute Bridge
One foot stays on the ground, the other points straight in the air. This increases the challenge on each glute and boosts balance.

2. Banded Glute Bridge
Place a resistance band just above your knees to activate the glute medius and improve knee alignment.

3. Weighted Glute Bridge
Add a dumbbell, barbell, or kettlebell across your hips for more resistance. This is a great way to progress toward heavier hip thrusts.

4. Elevated Glute Bridge
Place your feet on an elevated surface (like a bench or step) to increase the range of motion and fire up the hamstrings more.

How Many Reps and Sets Should You Do?
Here’s a quick guide depending on your goal:
-
For beginners: 2–3 sets of 10–15 reps with bodyweight
-
For strength: 3–5 sets of 6–8 reps with added weight
-
For endurance/glute activation: 3–4 sets of 15–20 reps or until fatigue
Rest 30–60 seconds between sets if your goal is activation or hypertrophy. For strength, rest up to 90 seconds.
How to Include The Glute Bridge Exercise Into Your Workout
Glute bridges are super versatile. You can use them as:
-
A warm-up: Do 2 sets of 15 reps before leg day to “wake up” your glutes.
-
A finisher: Try a burnout set at the end of your workout.
-
A standalone move: Perfect for home workouts, recovery days, or focused glute sessions.
Glute Bridge vs. Hip Thrust: What’s the Difference?
While both exercises target the glutes, they serve slightly different purposes.
| Feature | Glute Bridge | Hip Thrust |
|---|---|---|
| Surface | Floor | Bench or elevated surface |
| Equipment | Optional (bodyweight or dumbbell) | Typically uses barbell or resistance |
| Range of Motion | Shorter | Longer due to hip dip below bench level |
| Best For | Beginners, activation, rehab | Strength, hypertrophy |
If you’re new to glute training, start with glute bridges and work your way up to hip thrusts.